Monday, 27 December 2010

Mini 1275GT Restoration - Complete Pages

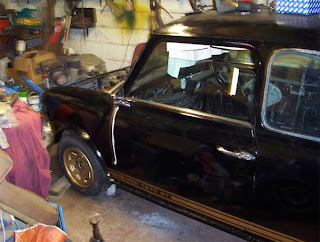
I bought this car specifically because it was an original car with original 1275 stripes on it, hopefully you can see that when we produce specific decals we make sure that they are right. I was able to make exact replicas from the original stripes. I kept this car for a number of years after quite an extensive restoration which included new sills, drivers front floor pan, new rear inner arches (which were a nightmare to change). New A panels and new front wings and a new roof repair panel. I sold this on fleebay for the reserve price of 1275 (bargain). 


The pictures below were of the finished car and used to list it for sale. I love these cars and I'm aiming to build a 'brand new' one in the near future hopefully.


An image of the new inner arches. The car was in pretty good condition in some areas as can be seen from this image.


The 'famous' three pod dashboard fitted to all 1275's


I avoided fitting spot lights to the front of this car but I quite like these, a brand new set of yokos and weller wheels were fitted as well.


The interior was okay, I managed to save the seats but the drivers seat  really did need recovering.


The wheel arches were replaced, primed and painted in body colour. This was surprisingly easy to do.


New wing mirrors, the internal roll cage was good to fit but did make it awkward getting in and out of the car. It was also a nightmare to fit as well as costing over £300.


I only fitted the half cage in the car, lucky really as this was tough but it did seem to strengthen the car up when cornering.


I was never keen on these fog lights but they had to be fitted because of the year of the car so I decided to go for the 205 GTi look.


I didn't do anything to this engine except fit the uprated engine stabliser bar.

Found Older pics of the Spitfire Restoration

These were initial photographs taken of the car before any major work. The last restoration took place in 1990 and included a body off restoration. The car when bought was only 10 years old and was bought at the height of the classic car market. The initial restoration included a new set of outriggers, bonnet hinge boxes and the main crossmember at the front of the chassis. This was then coated in Finnegans No1 and top coated in the body colour and wax oyled. Fortunately the chassis is still in good condition but many of the panels have rusted out again. Below shows some of the repairs needed. The hardtop in the picture was totally rusted through and a replacement was sourced a number of years ago from SpitBitz.


General suspension layout was okay but needed some work. I decided to replace everything and strip back all the components for reconditioning. Everything needed painting. The shock absorbers fitted here were actually bought from a British Leyland franchise in 89 believe it or not and were original parts. Again these are to be replaced with adjustable shocks and lowered springs. I also did not want to remove the engine and box as I recently replaced both with a reconditioned gearbox and a new unleaded engine bought from John Kipping before he emigrated.


Below you can also see the chassis with the turret removed and the original radiator in place. I had already welded the new sill on as you can see.


The bonnet was given to a fellow member of the TSSC and a new one was purchased, below you can also see the oil cooler in place and the bonnet turrets.


The O/S bonnet turret which has rusted through and will be replaced. When I originally fitted these this one was slightly out so I always had major problems with lining up the bonnet. I can now rectify this.

Monday, 20 December 2010

Triumph Spitfire Restoration

Classic British Sports Cars were the main reason I moved into designing and making vinyl stickers. I originally bought a MIni 1275GT in 1988 and this was the first car I 'attempted' to restore and the only part that was unavailable was the 1275GT stripes - www.mini1275gtstripes.co.uk
Anyway onto the Spitfire. The car pictured was my second car, bought in 1989, restored whilst I was in college and used until 1995 when an Austin Maxi ploughed into the back of it. Semi-restored, i.e rear end repaired but then taken off the road in 1997 and it's still undergoing a home restoration.
The plan is to put the car back on the road for the summer of 2011 so it's all systems go. We are also developing the Spitfire 1500 bonnet and boot lid decals ready for application on completion. I hope you enjoy the pics below, I'll keep posting them to keep you up to date with progress:


As you can see the car is Orange and is a 1979 car, wish I had a camera phone earlier on so some of the work has been missed. The above photo shows the rusty passenger floor. This was a new floor fitted in 1990 but had rusted out again (don't you just love these cars). I have already replaced the floor and sills on the drivers side.


A bit too much fresh air here, I tried to cut a few corners by repairing the existing floor which meant that I had already fitted new sills. For an MOT in 1996 I had to have a little bit of welding done to the floor and on closer inspection the guy who did it must have used armour plating as the plate must have been 3mm thick. Another reason to leave the old floor in place. Anyway I eventually came to my senses and decided to do it properly. However not the easiest thing to do with the sill still in place and it took nearly three days to cut out this floor and replace with the new one. Another one of life's lessons - there are no shortcuts.


New B post fitted as well from steelcraft along with new crossmembers on both sides.

Snow Flake Car or Window Stickers

These are very popular items currently although with the real stuff floating down everyones enthusiasm for snow has slightly dwindled, available to buy from both our stores:

www.aurum92.co.uk

www.christmasstickerfactory.co.uk

Two different photos below, one showing how we fitted these to our smart car and the other showing our car as it stands today!